 Christmas Deal is on: Save 25% off on select annual plans for 1st year.
Appium Tutorial: A Detailed Guide To Appium Testing
Appium is an open-source framework to automate testing of your web, native, and hybrid apps on different platforms like Android, iOS, and Windows.

What is Appium?
Developed by Dan Cuellar and Jason Huggins, Appium is an automated testing tool for web, native, and hybrid applications. It is supported on different mobile operating systems like Android, iOS, and Windows. When writing this article, Appium has about 15.3K Star and 5.7K Fork on GitHub.
Appium is a cross-platform tool that allows you to write UI tests for multiple platforms like Android, iOS, and Windows while using the same API. As a result, it enables code reuse between Android, iOS, and Windows test scripts or suites.
Like Selenium, Appium supports different programming languages and frameworks for mobile automation testing like Java, JavaScript, Python, PHP, C#, etc.
With the Appium framework, you can run app test automation of,
- Native mobile apps: These apps are installed on the device and written using Android, iOS, and Windows SDKs.
- Mobile web apps: The web apps are accessed in mobile web browsers like Chrome and Safari. You can also access mobile web applications using in-app browsers for Android and iOS.
- Hybrid apps: These applications are built with a wrapper around a "webview," a native control that allows interaction with web content. You can access hybrid apps from a physical device and a browser URL.
Want to know more about Web, Hybrid, and Native apps? Take a look at our comparison of Web vs Hybrid vs Native Apps.
Architecture of the Appium framework
This section of the Appium testing guide sheds light on the Appium framework's architecture. The Appium Architecture consists of three components -
- Appium Client
- Appium Server
- End Device
- Appium Client: The Appium client contains scripted automation code written in popular programming languages like Java, Python, Ruby, Perl, etc. The automation scripts contain the configuration details of the device and application. These scripted and configuration details are used in running the test cases.
- Appium Server: It is an HTTP server that receives JSON-formatted command requests from the client. The Appium server uses Node.js, and commands are then executed on mobile devices. Therefore, installing the server on your machine before running the test script is recommended.
- End Device: It refers to emulators, simulators, and a physical device connected to the Appium server where tests are run.
How does Appium work?
In this section of Appium testing tutorial, we will deep dive into the working of Appium framework.
Appium is a Node.js HTTP server that uses the REST API. The client interacts with the Appium server through REST APIs, which are controlled by the Mobile JSON Wire Protocol. The REST APIs accept client connections, listen for commands, execute commands, and send back the command execution status.

- To perform Appium testing, the first step is to create a session.
- During a session, the client sends a request to the server containing session-related information in key-value pairs, also known as Desired Capabilities. The Desired Capabilities enable Appium to differentiate between platforms (iOS or Android) and fire up a session on the mobile device, Android Emulator, or iOS Simulator.
- Using the JSON object (Desired Capabilities), the POST request is sent to the server, and Appium responds to it in the form of a session id.
- Once the session is up, the client and Appium server can interact with each other.
Appium works differently on platforms like Android and iOS. In the next section of this Appium testing tutorial, we will look at how Appium works on Android and iOS.
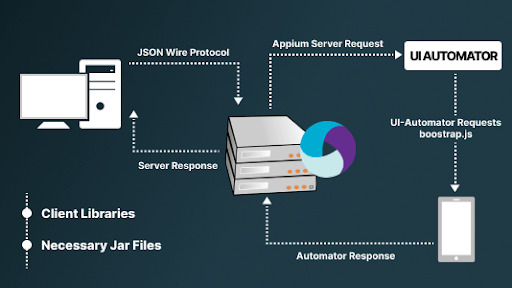
Working of Appium on Android
Appium Client libraries convert the test commands to the REST API requests with the help of the Mobile JSON Wire Protocol. The Appium server forwards these requests to the Android device or emulator. The Android device contains the bootstrap.jar files. The bootstrap.jar file interprets these test commands. The bootstrap.jar file uses Selendroid or UI Automator to execute the requests on the Android device.
The results of the tests are then sent to the Appium server, which sends an HTTP response (containing status codes) to the Appium client.
Working of Appium on iOS
Appium Client libraries convert test commands into REST API requests using the Mobile JSON Wire Protocol. The Appium server forwards these requests to an iOS device or simulator. The iOS device contains the WebDriverAgent.app files. WebDriverAgent.app interprets these test commands. WebDriverAgent.app uses XCUITest to execute requests on iOS devices.
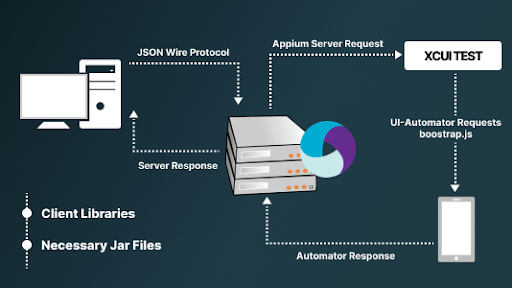
The results of the tests are then sent to the Appium server, which sends an HTTP response (containing status codes) to the Appium client.
Prerequisites to use Appium
Before automating your apps using Appium, make sure to install the following things on your system.
- Java (JDK)
- Android Studio
- Selenium Server JAR file
- Appium Desktop Client
- Eclipse IDE
- Apk Info - App on Google Play Store
- js (Not required in case of Appium Server installation as it comes by default)
How to install Appium
You can install Appium in two ways -
- NPM (Node Package Manager)
- Appium Desktop - a GUI application
Installing Appium through NPM: You will need Node.js and NPM to run Appium through npm install. You can use nvm, n, or brew install node to install Node.js.
You will likely encounter problems installing Node or Appium with sudo (or root). Appium supports Node.js 12+, so we recommend using the latest stable version.
To install Appium through NPM, run the following command in the terminal:
npm install -g appium
Installing Appium through Appium Desktop: You can download the latest version of Appium Desktop from the Appium Release page. If you want to know more about Appium Desktop, head over to our guide on Appium Inspector.
The next section of this Appium testing guide focuses on how to install Appium on Windows and macOS.
How to set up Appium on Windows?
Shown below are the following steps for installing Appium on your Windows machine.
- Before you begin the installation process, download the required files: Android Studio, Appium Jar files for Java, Appium Client Library, Java Appium Server
- Install Java and set the environment variables.
- Install the Android Studio and then create a new project.
- Extract the Appium Client library. Keep the extracted Appium Client library and Appium Jar files in a new folder.
- Open Project view in Android Studio, select the files you just extracted ( in Step 4) and place them in the libs folder.
- Now select all the files in the libs folder, right-click and select Add As Library.
- You should notice a build.gradle file in the app folder after adding the files as a library. Double-click that, then rebuild your project.
When the project is successfully rebuilt, it indicates that you have installed Appium on your system using Android Studio.
How to set up Appium on Mac?
Shown below are the following steps for installing Appium on your Mac machine
- Download Java and set the environment variables. Run the following command to configure the environment variables -
- This will launch the Vim Editor. To enter insert mode, press I and enter the following command.
- Now press the escape key and enter “:wq“ to return back to the terminal. Then enter the following command -
- Now install Xcode and Homebrew on your system. To install Homebrew, run the below command into your terminal.
- After that, run the following commands.
- Download the Appium server from its official site. Once the download is complete, click on the DMG file and follow the on-screen instructions. Next, simply drag and drop Appium into your applications folder after installing it. That wraps up the Appium setup on your Mac machine.
vim ~/.bash_profile
export JAVA_HOME = $(/usr/libexec/java_home)
export PATH = $JAVA_HOME/bin=$PATH
export PATH = /usr/local/bin:PATH
source ~/.bash_profile
/usr/bin/ruby -e "$(curl -fsSL
https://raw.githubusercontent.com/Homebrew/install/master/install)"
brew update
 brew doctor
xcode-select --install
Tutorial To Run Your First Test On LambdaTest
In this topic, you will learn how to configure and run your Java automation testing scripts with Appium on LambdaTest Real Device Cloud platform.
Objective
By the end of this topic, you will be able to:
- Run a sample automation script of Java for application testing with Appium on LambdaTest.
- Learn more about Desired Capabilities for Appium testing.
- Explore advanced features of LambdaTest.
SAMPLE REPO
Note : All the code samples in this documentation can be found on LambdaTest's Github Repository. You can either download or clone the repository to quickly run your tests. View on GitHub
Pre-requisites
Before you start performing your App automation testing with Appium, please make sure:
- You have access to LambdaTest username and accessKey. If you have not registered yet, you can do the same by visiting our website. You will be able to access the credentials at the LambdaTest Profile.
- Make sure you have the Java client library installed for Selenium and Appium.
- Download and install Maven with help of the steps from the official website. Maven can also be installed easily on Linux/MacOS using Homebrew package manager.
Run your first test
- Upload your Application
Upload your iOS application (.ipa file) or android application (.apk or .aab file) to the LambdaTest servers using our REST API. You need to provide your username and accessKey in the format Username:AccessKey in the cURL command for authentication. Make sure to add the path of the appFile in the cURL request. Below is an example cURL request to upload your app using our REST API:
Using App File from System:
curl -u "YOUR_LAMBDATEST_USERNAME:YOUR_LAMBDATEST_ACCESS_KEY" -X POST "https://manual-api.lambdatest.com/app/upload/realDevice" -F "appFile=@"/Users/macuser/Downloads/proverbial_android.apk"" -F "name="proverbial_app""Using App URL:
curl -u "YOUR_LAMBDATEST_USERNAME:YOUR_LAMBDATEST_ACCESS_KEY" -X POST "https://manual-api.lambdatest.com/app/upload/realDevice" -F "url=:https://prod-mobile-artefacts.lambdatest.com/assets/docs/proverbial_android.apk" -F "name=Proverbial_App"TIP
Note : If you do not have any .apk or .ipa file, you can run your sample tests on LambdaTest by using our sample apps, 🔗 Android app or 🔗 iOS app.
Response of above cURL will be a JSON object containing the APP_URL of the format- lt://APP123456789123456789 and will be used in the next step.
Clone the LambdaTest’s 🔗 LT-appium-java repository and navigate to code directory as shown below:
git clone https://github.com/LambdaTest/LT-appium-java

cd LT-appium-javaMake sure you have your LambdaTest credentials with you to run automation scripts on LambdaTest. To obtain your credentials, purchase a plan or access them at Automation Dashboard. Then, set LambdaTest username and accessKey in environment variables with following commands.
Here's how you do in Linux / MacOS:
export LT_USERNAME=YOUR_LAMBDATEST_USERNAME
export LT_ACCESS_KEY=YOUR_LAMBDATEST_ACCESS_KEY
Here's how you do in Windows:
set LT_USERNAME=YOUR_LAMBDATEST_USERNAME '
set LT_ACCESS_KEY=YOUR_LAMBDATEST_ACCESS_KEYAn automation script for the sample application given above has been provided here. Ensure to update the APP_URL, username and accessKey in the code scripts before running the tests.
Appium automation script for testing Android app:
import io.appium.java_client.AppiumDriver;
import io.appium.java_client.MobileBy;
import io.appium.java_client.MobileElement;
import org.openqa.selenium.JavascriptExecutor;
import org.openqa.selenium.remote.DesiredCapabilities;
import org.openqa.selenium.remote.RemoteWebDriver;
import java.net.MalformedURLException;
import java.net.URL;

public class vanilla_android {
    public static String userName = System.getenv("LT_USERNAME") == null ? "LT_USERNAME"  //Add LambdaTest username here
            : System.getenv("LT_USERNAME");
    public static String accessKey = System.getenv("LT_ACCESS_KEY") == null ? "LT_ACCESS_KEY" //Add LambdaTest accessKey here
            : System.getenv("LT_ACCESS_KEY");

    private static AppiumDriver driver;

    public static void main(String args[]) throws MalformedURLException, InterruptedException {

        try {
            DesiredCapabilities capabilities = new DesiredCapabilities();
            capabilities.setCapability("deviceName", "Galaxy S20");
            capabilities.setCapability("platformVersion", "11");
            capabilities.setCapability("platformName", "Android");
            capabilities.setCapability("isRealMobile", true);
            capabilities.setCapability("app", "APP_URL");     //Enter your app url
            capabilities.setCapability("deviceOrientation", "PORTRAIT");
            capabilities.setCapability("build", "Java Vanilla - Android");
            capabilities.setCapability("name", "Sample Test Java");
            capabilities.setCapability("console", true);
            capabilities.setCapability("network", false);
            capabilities.setCapability("visual", true);
            capabilities.setCapability("devicelog", true);

            driver = new AppiumDriver(new URL("https://" +userName + ":" + accessKey + "@mobile-hub.lambdatest.com/wd/hub"), capabilities);

            MobileElement color = (MobileElement) driver.findElement(MobileBy.id("com.lambdatest.proverbial:id/color"));
            color.click();

            MobileElement text = (MobileElement) driver.findElement(MobileBy.id("com.lambdatest.proverbial:id/Text"));
            //Changes the text to proverbial
            text.click();

            //toast is visible
            MobileElement toast = (MobileElement) driver.findElement(MobileBy.id("com.lambdatest.proverbial:id/toast"));
            toast.click();

            //notification is visible
            MobileElement notification = (MobileElement) driver.findElement(MobileBy.id("com.lambdatest.proverbial:id/notification"));
            notification.click();

            //Open the geolocation page
            MobileElement geo = (MobileElement) driver.findElement(MobileBy.id("com.lambdatest.proverbial:id/geoLocation"));
            geo.click();
            Thread.sleep(5000);

            //takes back to home page
            MobileElement el3 = (MobileElement) driver.findElementByAccessibilityId("Home");

            driver.navigate().back();
            Thread.sleep(2000);

            //Takes to speed test page
            MobileElement speedtest = (MobileElement) driver.findElement(MobileBy.id("com.lambdatest.proverbial:id/speedTest"));
            speedtest.click();
            Thread.sleep(5000);

            driver.navigate().back();

            //Opens the browser
            MobileElement browser = (MobileElement) driver.findElement(MobileBy.AccessibilityId("Browser"));
            browser.click();

            MobileElement url = (MobileElement) driver.findElement(MobileBy.id("com.lambdatest.proverbial:id/url"));
            url.sendKeys("https://www.lambdatest.com");
            MobileElement find = (MobileElement) driver.findElement(MobileBy.id("com.lambdatest.proverbial:id/find"));
            find.click();

        } catch (AssertionError a) {
            ((JavascriptExecutor) driver).executeScript("lambda-status=failed");
            a.printStackTrace();
        }
// The driver.quit statement is required, otherwise the test continues to execute, leading to a timeout.
        driver.quit();
    }
    }
Appium automation script for testing iOS app:
import io.appium.java_client.AppiumDriver;
import io.appium.java_client.MobileBy;
import io.appium.java_client.MobileElement;
import io.appium.java_client.ios.IOSDriver;

import org.openqa.selenium.remote.DesiredCapabilities;
import org.openqa.selenium.support.ui.ExpectedConditions;
import org.openqa.selenium.support.ui.WebDriverWait;

import java.net.URL;

public class vanilla_ios {
    public static String userName = System.getenv("LT_USERNAME") == null ? "LT_USERNAME"  //Add LambdaTest username here
            : System.getenv("LT_USERNAME");
    public static String accessKey = System.getenv("LT_ACCESS_KEY") == null ? "LT_ACCESS_KEY" //Add LambdaTest accessKey here
            : System.getenv("LT_ACCESS_KEY");

    public static final String URL = "https://" + userName + ":" + accessKey + "@mobile-hub.lambdatest.com/wd/hub";
    public static IOSDriver driver = null;

    public static void main(String[] args) throws Exception {

       try {
            DesiredCapabilities caps = new DesiredCapabilities();
            caps.setCapability("platformVersion", "15");
            caps.setCapability("deviceName", "iPhone 12");
            caps.setCapability("isRealMobile", true);
            caps.setCapability("app", "APP_URL"); //Enter your app url
            caps.setCapability("platformName", "iOS");
            caps.setCapability("build", "Java Vanilla - iOS");
            caps.setCapability("name", "Sample Test Java");
            caps.setCapability("devicelog", true);
            caps.setCapability("network", false);


        driver = new IOSDriver(new URL("https://" + userName + ":" + accessKey + "@beta-hub.lambdatest.com/wd/hub"), caps);


            Thread.sleep(2000);

            //Changes color

            driver.findElement(MobileBy.id("color")).click();
            Thread.sleep(1000);

            //Back to black color
            driver.navigate().back();

            Thread.sleep(1000);

            //Changes the text to proverbial
            driver.findElement(MobileBy.id("Text")).click();
            Thread.sleep(1000);

            //toast is visible
            driver.findElement(MobileBy.id("toast")).click();
            Thread.sleep(1000);

            //notification is visible
            driver.findElement(MobileBy.id("notification")).click();
            Thread.sleep(2000);

            //Open the geolocation page
            driver.findElement(MobileBy.id("geoLocation")).click();
            Thread.sleep(4000);
            driver.navigate().back();
            Thread.sleep(1000);

            //Takes to speed test page
            driver.findElement(MobileBy.id("speedTest")).click();
            Thread.sleep(5000);
            driver.navigate().back();
            Thread.sleep(1000);

            //Opens the browser
            MobileElement browser = (MobileElement) driver.findElementByAccessibilityId("Browser");
            browser.click();
            Thread.sleep(3000);

           WebDriverWait el7 =  new WebDriverWait(driver, 30);
           el7.until(ExpectedConditions.elementToBeClickable(MobileBy.id("url")));
           driver.findElementById("url").sendKeys("https://www.lambdatest.com/");

            //Clicks on the text box
            WebDriverWait el = new WebDriverWait(driver,90);
            MobileElement el4 = (MobileElement) driver.findElementByAccessibilityId("find");
            el.until(ExpectedConditions.elementToBeClickable(el4));
            el4.click();
            el4.sendKeys("Lambdatest");

            //((JavascriptExecutor) driver).executeScript("lambda-status=passed");
            driver.quit();

        } catch (Exception t) {
           System.out.println(t);
           driver.quit();

       }
    }
}
Configure the test capabilities
You can update your custom capabilities in test scripts. In this sample project, we are passing platform name, platform version, device name and app url (generated earlier) along with other capabilities like build name and test name via capabilities object. The capabilities object in the sample code are defined as:
For Android:
DesiredCapabilities capabilities = new DesiredCapabilities();
            capabilities.setCapability("deviceName", "Galaxy S20");
            capabilities.setCapability("platformVersion", "11");
            capabilities.setCapability("platformName", "Android");
            capabilities.setCapability("isRealMobile", true);
            capabilities.setCapability("app", "YOUR_APP_URL"); //Enter your app url
            capabilities.setCapability("deviceOrientation", "PORTRAIT");
            capabilities.setCapability("build", "Java Vanilla - Android");
            capabilities.setCapability("name", "Sample Test Java");
            capabilities.setCapability("console", true);
            capabilities.setCapability("network", false);
            capabilities.setCapability("visual", true);
            capabilities.setCapability("devicelog", true);
For iOS:
DesiredCapabilities caps = new DesiredCapabilities();
            caps.setCapability("platformVersion", "15");
            caps.setCapability("deviceName", "iPhone 12");
            caps.setCapability("isRealMobile", true);
            caps.setCapability("app", "YOUR_APP_URL"); //Enter your app url
            caps.setCapability("platformName", "iOS");
            caps.setCapability("build", "Java Vanilla - iOS");
            caps.setCapability("name", "Sample Test Java");
            caps.setCapability("devicelog", true);
            caps.setCapability("network", false);
Note : You must add the generated APP_URL to the app capability in the config file.
You can generate capabilities for your test requirements with the help of our inbuilt Capabilities Generator tool . For more details, please refer to our guide on Desired Capabilities in Appium
- Run the following commands to install the required dependencies:
mvn clean installFor Android:
mvn test -P androidFor iOS:
mvn test -P iosINFO
Note : Your test results would be displayed on the test console (or command-line interface if you are using terminal/cmd) and on the 🔗 LambdaTest App Automation Dashboard .
Limitations of Appium
Shown below is the limitation of the Appium framework.
- Currently, Appium testing with Android doesn’t support Android versions below 4.2.
- Appium desktop inspector cannot be run directly on Microsoft Windows.
- While performing Appium testing on the iOS platform, the test execution is slow.
- It doesn’t support older Android APIs.
- Setting up and configuring Appium for Android and iOS is a time-consuming process.
- It doesn’t generate detailed test reports.
Troubleshooting Steps for Common Errors in Appium testing
This section of Appium testing tutorial covers some unexpected errors that you may encounter while performing Appium testing of mobile applications. Here is a list of common Appium errors and how to fix them.
- If you're using Fastboot to run your Android emulator and it's not being detected properly by ADB, perform a cold boot. Go to Android Studio > Tools > AVD Manager > Actions > Cold Boot Now. This will mainly resolve all emulator issues.
- When the Instrument crashes on iOS ("exited with code 253"), ensure Xcode has downloaded device symbols. Once you click on Window > Devices, it should automatically start. After upgrading iOS versions, it is needed.
- We must unlock the macOS keychain to build the app and the WebDriverAgent. Therefore, it is imperative when you use SSH.
- When you install Node and npm via MacPorts, Appium may have difficulty finding the node executable. It is necessary to include the MacPorts bin folder (default path is /opt/local/bin) in PATH in
/.profile,/.bash_profile, or~/.bashrc. - Running iOS tests and getting the error "[INST STDERR] posix spawn failure; aborting launch" means your app is not compiled correctly.
Why is Appium so popular?
It is no secret that the mobile industry is growing rapidly. To ensure faster application delivery, organizations heavily rely on mobile automation testing. According to a survey, Appium holds sway in the mobile domain, with 35% of organizations preferring it over other free or open-source test automation tools.
In addition to Appium, many other open-source tools are available for automating mobile testing. However, to communicate with native mobile apps, most tools require an additional agent to compile most of the application code. Unlike other tools, Appium enables communication between different apps and does not require your app to include any extra agents.
Shown below are the pointers that keep Appium ahead of other mobile test automation tools -
- Like Selenium Server, Appium works like a server and runs in the background.
- It has a built-in UI Automator for inspecting mobile apps to get detailed information logs and reporting structures.
- It can automate any mobile app built in different programming languages and frameworks.
- Appium allows you full access to back-end APIs and databases from test scripts.
- Appium syncs well with the TestNG testing framework.
- It makes regression testing of mobile apps easier.
- Appium doesn’t require installation on mobile devices for mobile app testing.
- It uses Selenium WebDriver JSON Protocol to work with native Android and iOS mobile applications.
- Using Appium, you can test apps on Emulators and Simulators and real device cloud.
- You can perform parallel testing of your Appium automation scripts with Xcode, UIAutomator, and UIAutomation. Check our guide on Appium Parallel testing.
History of Appium
This section of Appium testing tutorial talks about the history of the Appium framework.
In 2011, Dan Cuellar was the Test Manager at Zoosk when he encountered an issue. In the iOS product, the number of test passes was becoming excessive. He realized that automation was the solution to this problem. Dan examined the existing tool landscape. However, he was not satisfied with the existing options. Instead, he requested more time from his manager to see if he could find a better way. Then iOS Auto was developed.
Selenium Conference 2012
At Selenium Conference 2012 in London, Dan demonstrated iOS Automation testing using Selenium syntax to show writing platform-agnostic tests that use distinct platform-specific page objects with a standardized interface. Jason Huggins, co-creator of Selenium, moderated the sessions.
Meet Up
Jason approached Dan four months after the Selenium Conference. Jason convinced Dan to make his code available under an open-source license. Dan released the source code in C# on GitHub in August, followed by a new version in Python. Jason installed a web server in September and began implementing the WebDriver wire protocol over HTTP, allowing iOS Auto to be scripted from any Selenium WebDriver client library in any programming language.
Mobile Testing Summit
Jason decided to present the project at the Mobile Testing Summit in November, but he recommended that it be given a new name first. They chose AppleCart after considering several options. After reading Apple's copyright and trademark guidelines, Jason observed that the first term Apple would defend its rights against was "AppleCart." Jason and Dan then chose the new name Appium - Selenium for Apps.
Appium Across The Globe
At the 2013 Google Test Automation Conference, Appium made its debut in its current form. That same year, Appium was showcased in the United States, England, Poland, Portugal, and Australia at conferences and meetups. Appium became the first cross-platform automation framework when it added Android and Selendroid support in early 2013.
Introduction To Appium 1.0
Appium began to mature and expand significantly. Appium 1.0 was launched in May 2014, marking a turning point in the project's evolution. Appium received numerous honors and became the most popular open-source, cross-platform mobile automation framework. Appium received the 2014 InfoWorld Bossie award for the best open source desktop and mobile software. Black Duck Software also named Appium an Open Source Rookie of the Year.
Appium was redesigned from the ground up, utilizing a more contemporary version of the JavaScript language and rebuilding the architecture so that users and third-party developers can easily create their own Appium drivers.
Is Appium similar to Selenium?
As far as Selenium and Appium are concerned, both are open-source automation testing tools. Selenium enables automated browser testing across different browsers and operating system combinations by automatically controlling browser actions, whereas Appium involves automated app testing of native, web, and hybrid apps.
But Appium is based on Selenium and uses JSON WireProtocol internally to interact with Android and iOS apps via Selenium WebDriver. Appium's architecture consists of a Node.js HTTP server that creates and manages multiple WebDriver sessions. Appium launches tests on the device and waits for commands from the Appium server. It is similar to the Selenium server, which receives HTTP requests from Selenium client libraries.
Is Appium easy to learn?
Yes! The learning curve of Appium is quite simple and easy. It employs the remote WebDriver protocol and supports various languages and frameworks. You can begin your Appium testing journey if you have good experience writing tests in languages like Java, Python, PHP, C#, and others.
Please refer to our Appium testing tutorial for more information on the essentials of Appium.
How do I get started with Appium?
Appium is an excellent framework to include in your test automation plan. However, it is critical to conduct Appium testing effectively. Setting up, running, and scaling in-house device labs is costly. This demands the use of a real device cloud platform like LambdaTest. With LambdaTest online device farm, you can get rid of your in-house device labs and allow your developers and testers to conduct Appium testing on real devices from anywhere at any time.
About LambdaTest
LambdaTest is a leading test execution and orchestration platform that is fast, reliable, scalable, and secure. It allows users to run manual and automated testing of web and mobile apps across 3000+ browsers, operating systems, and real device combinations. Using LambdaTest, businesses can ensure quicker developer feedback and hence achieve a faster go-to-market. Over 500 enterprises and 2 Million + users across 130+ countries rely on LambdaTest for their testing needs.
Getting Started with Appium testing on LambdaTest
To start Appium testing on LambdaTest, you can refer to our Appium testing support documentation for a step-by-step procedure for running your first Appium test script on a cloud Appium Grid. So you don’t have to worry about the challenges with Appium infrastructure as we will provide you with a cloud Appium Grid with zero downtime.
Want to know a fun fact? Your first 100 Appium testing minutes are on us with just a free sign-up. In addition, you can also avail benefits of manual cross browser testing, manual app testing, Visual UI testing, responsive testing, and more with a lifetime of free access to LambdaTest, the world’s fastest-growing test orchestration, and execution platform.
Ready to automate your apps using Appium? To get started, watch our Appium testing tutorial video.